


Not exactly, it really comes down to personal preference.
Wrap & Tuck
Band Installation Guide
This band installation guide will go over setup of your Wrap & Tuck slingshot, and show you how to safely and properly set up and use your slingshot with the
Wrap & Tuck Band Installation Method.
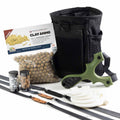
This is the SimpleShot Guide to installing a slingshot band set using the Wrap & Tuck Band Installation Method, which is the same for any Wrap and Tuck Slingshot model regardless of your preferred slingshot band configuration. We recommend using Band Tying Tape (aka Amberbelt) to securely tie your bands with the Wrap & Tuck method.
Note: It is important to always install your bands on the target side of the slingshot so that the bands form a nice trough when drawing your bands and looking down through the forks of your slingshot.
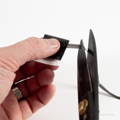
Once your bands have been wrapped and adjusted, you can trim the excess tag or leave it in place for easy removal when you need
to remove the bands for replacement. Simply pull the excess band tag up and the band tying tape will unravel.
As you'll notice, the Wrap And Tuck Band Tying Method is very secure, dependable, strong, and sleek with almost no additional bulkiness added to your slingshot forks and a tight grip for accurate slingshot shooting.
WRAP & TUCK BAND INSTALLATION
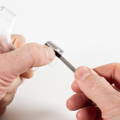
Step 1.
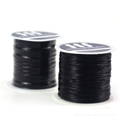
Cut off a ~10" strip of tie-in tape from the supplied spool (comes with ~3ft.)

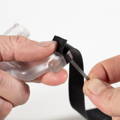
Step 2.
Start your foundation wrap (shown OTT). Stretching hard makes it difficult.
Step 3.
Make two foundation wraps to form a good strong base for your tie-in.
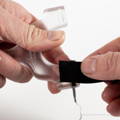
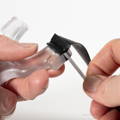
Step 4.
Place the bandset onto the foundation wraps (don't let go of the wraps).
Leave enough excess band to be able to fold the end back up and re-capture it, for extra strength. Use the bottom of the forktip as a guide to make sure you leave enough excess.
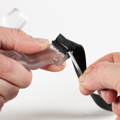
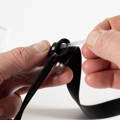
Step 5.
Firmly hold the end of the bandset and the foundation wraps as you start your first tie-in wrap.

Step 6.
Keep the tape stretched tight as you begin to make your wraps. Keep it flat for best performance.
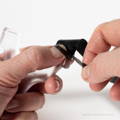
Step 7.
Keep stretching and make 2 - 3 tight wraps to firmly capture the bandset into the frame groove.
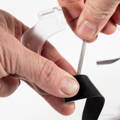
Step 8.
Now, fold the end of the bandset back up (leave some slack in the fold) to wrap OVER this folded layer.
Keep stretching the tie-in material the whole time you are wrapping. Keep it under tension because the retraction of the tape is what provides the strength of the tie-in method.
Step 9.
Keep stretching as you continue to wrap over the folded end of the bandset. Keep it tight!
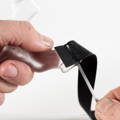
Step 10.
Complete 2 firm wraps. Don't loose your grip. If you do, it will come loose and you'll have to start over.

Step 11a. (Thumb method)
Place your thumb firmly on the forktip to hold the band and tie-in as you make 2 more wraps.
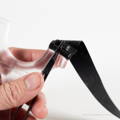
Step 11b. (Lanyard method)
You may use your lanyard (or anything that works) and make those 2 wraps.
Step 11 may be completed with anything that allows you to capture the tag end of the tie-in tape and bring it UNDER the final 2 wraps. You may use your thumb, a pair of hemostats / tweezers, your lanyard or anything that lets you pull the tag end through. Be careful to not damage the tape if you do use a tool to capture it.

Step 12a. (thumb method)
Pull the tag end under your thumb to capture the tag end of the tape.
Step 12b. (lanyard method)
Place the tag end through the lanyard loop to capture the tag end.
Step 12c. (tool method)
If using hemostats or tweezers, grab the tag end in the tool.
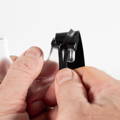
Step 13.
Whether using your thumb, lanyard or a tool, pull the tag end under the final 2 wraps.
In step 9 - 11, you can use a tool (such as forceps, tweezer, hemostats, or small pliers) or a loop or string/paracord to pull the tag end through. Be careful to not damage the tie-in material as you grip it to pull it through.

Optional thumb method.
When using the thumb method, you can leave the very end of the tape in place and pull the loop through for easy removal. Just pull the tag end to release the tie-in.

One side is done!
When you pull the tag end all the way through (if you used an installed lanyard, you must), you can trim off the excess if you'd like. Not too close!

Test it out!
Complete the other side and give your bands a few careful draws to make sure they are rock-solid and you are ready to shoot!
Watch this video to see it in action on the Champ!
Frequently Asked Questions
Is wrap and tuck still the preferred method of slingshot band attachment?
What can I tie my bands on with?
We recommend using band tying tape (also called amberbelt, even though it's not amber), because of its strength and elasticity.
Can I shoot OTT and TTF?
If you don't know, this question is probably not for you, but the answer is YES, as long as your slingshot is designed for both methods. Some slingshots, like the Sparrow, are only designed for OTT, and cannot be fitted for TTF.
In case the abbreviations have you scratching your head, OTT means "Over The Top" and TTF means "Through The Forks."