

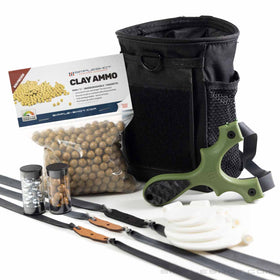

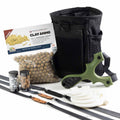


Absolutely. It comes with a lanyard, two powerful bandsets, and tie-in tape to attach them to the frame. Everything you need to shoot is included. It might even include a SimpleShot sticker. :) You supply the ammo.
The Torque X Slingshot - Owners Manual
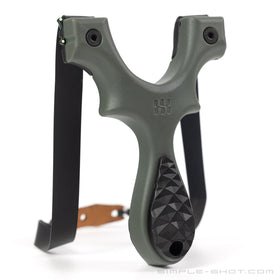
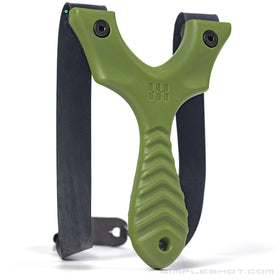
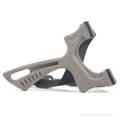
The Torque has been a longstanding feature in the slingshot lineup here at SimpleShot. And now it's a family. With the new Torque X (introduced during Year X), the lineup now includes a smaller brother of the original.
This manual will go over setup of your Torque X slingshot and show you how to safely and properly set up and use it!
Get to know your Torque x Slingshot
The Torque slingshot was introduced in 2014 to worldwide acclaim. Designed by the amazing Mark Seljan, the Torque brought an all-new approach to asymmetrical – yet ambidextrous – slingshots to the world.
Over the years, the Torque racked up a huge fan base who simply LOVE the Torque and shoot little else. But that fan base had a few requests that rose to the top as commonly requested features for a new Torque slingshot . . .
In response to these requests, we made the Torque X slingshot for our Year X celebrations! Smaller all around except thickness, the Torque X is still a little bit heavier than the original, keeping the heft we all love in a slingshot. There are no holes for looped tubes, no FlipClips and the Torque X accommodates a full pinch grip (the #1 request).
Keep scrolling for the video owners manual that covers setup demonstration!
Choose the Shooter Side of the Frame
This is the side of the slingshot that faces you when you shoot the slingshot. You may hold it either way.
Shown above in a left-hand hold as it was designed (larger fork facing down.

Identify the Target Side of the Frame
The target side faces the target when shooting and is the side to which you attach your bands.
Shown above in the same left-hand hold as designed.
Remember, the choice is yours.
The Torque X was designed to be held with the larger fork facing down, but if you prefer the larger fork facing up, no problem. Shoot it however it feels best to you! The important part is to identify the target side and shooter side based on YOUR preference

OTT (Over The Top) banding
You've got ONE choice with the Torque X. It shoots over the top only. There is no TTF option with the Torque X.

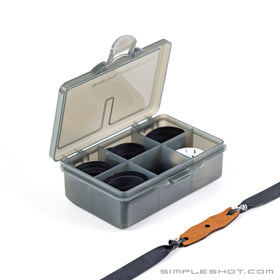
The Lanyard (installed)
The lanyard is a critical piece of safety gear! Make sure to ALWAYS use it!

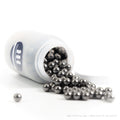
Do not shoot stones or rocks from any slingshot.
Rocks - no matter how round they look – shoot erratically and shooting them may damage your slingshot and bands.
Due to the uncontrollable nature of shooting non-spherical projectiles, shooting a rock from a SimpleShot slingshot voids any / all warranties.
Torque X SLINGSHOT SETUP INSTRUCTIONS
How to install your bandset onto your slingshot
Often referred to as "wrap and tuck," this method of band attachment relies on a tie-in material with some stretch to tightly attach the band set to the frame using tension and friction. A favorite method of many shooters, the tie-in (or wrap and tuck) method is a very slim and unobtrusive way to fasten your bands to your slingshot frame.
It takes some practice to become proficient, so we call the Torque X and intermediate slingshot for this reason. Give it some time and practice and this process will become simple. Don't be discouraged if your first few tries don't go so well.
⚠️ Take a minute. Make sure everything is right before you start.
- Bands attach to the TARGET SIDE of the frame.
- The inside of the pouch (the "fuzzy" side) will always be facing UP.
- The "ears" (the end of the latex band that is tied to the pouch) of the pouch tie-in face DOWN.
- Keep this band orientation as you complete the installation.
- Do NOT let the bands twist during tie-in or you will have to take it apart to fix it.
If this is your first time, we STRONGLY recommend watching the entire installation video to see the process.
Step 1.
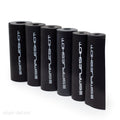
Cut off a ~10" strip of tie-in tape from the supplied spool (comes with ~3ft.)

Step 2. (optional)
Start your foundation wrap. Stretch firmly, but not too much or it will pop loose.

Step 3. (optional)
Make two foundation wraps to form a good strong base for your tie-in.

Step 4.
Place the bandset onto the frame (don't let go of the foundation wraps if you have them).
Leave enough excess band to be able to fold the end back up and re-capture it, for extra strength.
Make sure you leave extra band material under the tie-in as shown in step 4. See step 8 to see why.

Step 5.
Firmly hold the end of the bandset (or the foundation wraps) as you start your first tie-in wrap.

Step 6.
Keep the tape stretched tight as you begin to make your wraps. Keep it flat for best performance.

Step 7.
Keep stretching and make 2 - 3 tight wraps to firmly capture the bandset into the frame groove.

Step 8.
Now, fold the end of the bandset back up. You will wrap OVER this folded layer.
Keep stretching the tie-in material the whole time you are wrapping. Keep it under tension because the retraction of the tape is what provides the strength of the tie-in method. You'll develop a feel for this with practice!

Step 9.
Keep stretching as you continue to wrap over the folded end of the bandset. Keep it tight!

Step 10.
Complete 2 firm wraps. Don't be discouraged if you drop it and have to start over.

Step 11a. (thumb method)
Place your thumb firmly on the forktip to hold the band and tie-in as you make 2 more wraps.

Step 11b. (tool method)
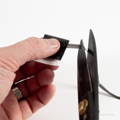
Make 2 final, firm wraps OVER the tool of your choice (hemostats shown here).
Step 11 may be completed with anything that allows you to capture the tag end of the tie-in tape and bring it UNDER the final 2 wraps. You may use your thumb, a pair of hemostats / tweezers, your lanyard or anything that lets you pull the tag end through. Be careful to not damage the tape if you do use a tool to capture it.

Step 12a. (thumb method)
Bring the tag end under your thumb, between your thumb and the band material.

Step 13a. (thumb method)
Using friction on the tag end, pull it through under the final two wraps with your thumb.
Step 13b. (tool method)
Grab the tag end with the tool so you can complete "the tuck" to secure the tie-in.

Step 13b. (tool method)
Grab the tag end with the tool and pull it under the last 2 wraps to secure the tag end.
In step 11 - 13, you can use a tool (such as forceps, tweezer, hemostats, or small pliers) or a loop or string/paracord to pull the tag end through. Be careful to not damage the tie-in material as you grip it to pull it through.

Clean it up.
You can remove any excess material from the tag ends. Do not cut so close that you lose your tucked end. You would have to start completely over!

Complete the other side in the same way.
The other side works just the same. It's a little bit trickier, since you have to wrap through the completed bandset (since one side is already attached) but you've got this

Test it out!
Make sure there are no twists or errors, and test your installation as you stretch your bands out. Give a few good stretches and examine your installation for a secure fit.
And now, watch the video to see it in action!
Frequently Asked Questions
Does the Torque X come with everything I need to shoot?
Is the Torque X perfect for beginners?
We wouldn't say perfect, no. The Torque X is a small slingshot frame that requires the bands to be tied in, so it takes a bit of skill to do so. The perfect beginner slingshot is the Scout XT.
Can I hunt with the Torque X?
For sure. The Torque X is a great hunting slingshot. (Pro tip: it's not really the frame, it's the bandsets that make a slingshot perfect for hunting. The power comes from the bands!) The original Torque has been a popular hunting slingshot since 2014.
Does the Torque X come with FlipClips or Ocularis?
Nope. This is a good old wrap and tuck slingshot. The only way to fasten a bandset to the Torque X is to tie it on. No clips. No plugs.
What can I tie my bands on with?
The Torque X comes with about a meter of tie-in tape (also called amberbelt, even though it's not amber). This is plenty to get your bands tied on. As you get more experience you'll need less and less, but it's very affordable.
Can I make FlipClips fit the Torque X?
That's a hard no. If you do, you will have weakened the structure of the slingshot, will void all warranties and will put yourself at risk of harm. Do not ever modify a slingshot!
Can I shoot OTT and TTF?
No. The Torque X is an OTT only slingshot.
What is the difference between the Torque and Torque X?
Approximately 10% smaller outer dimensions than the original
25% thinner fork tips
Nearly 20% wider fork gap
Almost identical thickness
Approximately 5% heavier
No holes for looped tubes
Tie-in band attachments only
Full pinch grip supported